-
유투버 'Keith Galli' 강의 참조
- 현재까지 'Running time', 'Budget', 'Box office' 부분을 따로 변수화 및 통일화 시켜 만들었다. 마지막으로 날짜를 통일화 시켜 보자
♣ Release date 훑어 보기

- 쓰려고 하는 데이터 패턴이 제멋데로인걸 볼 수 있다. 통일화 시키자
1. 데이터 확인
# Convert Dates to datetiems
print([movie.get('Release date', 'N/A') for movie in movie_info_list])
통일화가 필요 하다. 2. 'datetime'을 이용하여 내용 보기
- 각각의 날짜를 뽑아와서 변수에 담기
#June 28, 1950

from datetime import datetime

dates = [movie.get('Release date', 'N/A') for movie in movie_info_list]

print(dates)
- 이 변수를 함수를 통해 정제 작업
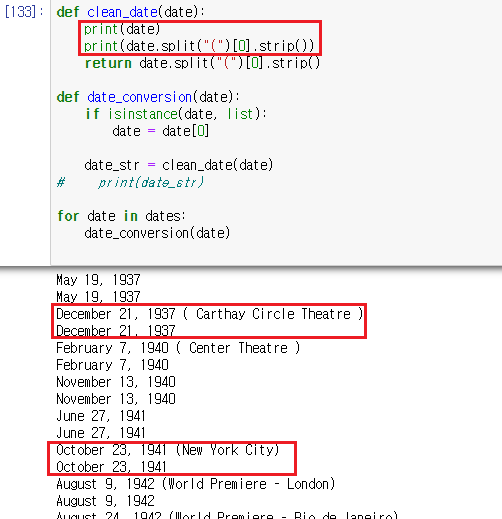
dates = [movie.get('Release date', 'N/A') for movie in movie_info_list] def clean_date(date): return date.split("(")[0].strip() def date_conversion(date): if isinstance(date, list): date = date[0] if date == "N/A": return None date_str = clean_date(date) # print(date_str) for date in dates: date_conversion(date)- for문을 통해 date 값을 받아 date_conversion() 함수에 넘김
- date_conversion() 함수는 리스트이면 0번째 값으로 date를 변수화 아니면 그냥 들고 옴
- 그 결과 값으로 다시 clean_date() 함수를 타게 됨
- clean_date() 함수는 넘어오는 매개변수값중 '(' 뒷값은 다 없앰.
3. 정제 작업
def clean_date(date): return date.split("(")[0].strip() def date_conversion(date): if isinstance(date, list): date = date[0] if date == "N/A": return None date_str = clean_date(date) print(date_str) fmts = ["%B %d, %Y", "%d %B %Y"] for fmt in fmts: try: return datetime.strptime(date_str, fmt) except: pass return None #테스트용 for date in dates: print(date_conversion(date)) print()- datetime의 .strptime() 함수는 포맷 형식으로 지정한 문자스트링을 tm 형식으로 날자값을 돌려줌
- 결국 date_str로 변경된 값이 fmts for문을 통해 걸러지게 됨

▶ 테스트
for movie in movie_info_list:
    movie['Release date (datetime)'] = date_conversion(movie.get('Release date', 'N/A'))
4. 정제된 데이터 다시 저장
save_data('Disney_movie_data_cleaned.json', movie_info_list)- 이렇게 저장을하면 아래와 같은 오류가 뜬다.

- 이는 'pickle'을 이용하면 쉽게 해결이 가능 하다.
import pickle

def save_data_pickle(name, data):
    with open(name, 'wb') as f:
        pickle.dump(data, f)

def load_data_pickle(name):
    with open(name, 'rb') as f:
        return pickle.load(f)

save_data_pickle('disney_movie_cleaned.pickle', movie_info_list)
a = load_data_pickle('disney_movie_cleaned.pickle')
a[5]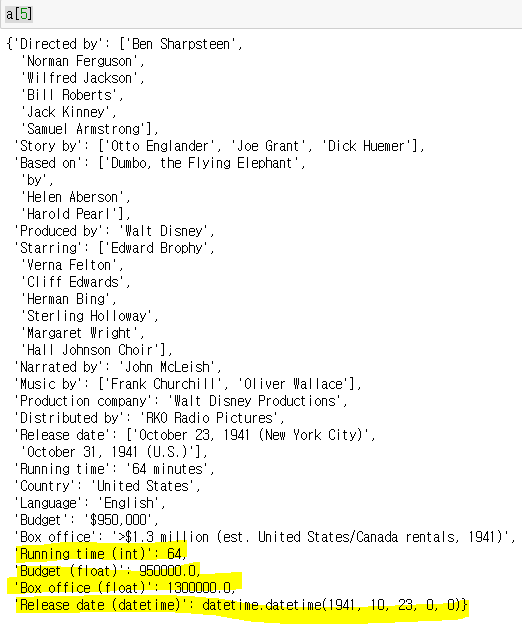
5. API를 활용하여 영화 평점 넣어 보기
- IMDB 사이트에가보면 원하는 영화를 입력하여 평점을 볼 수 있는데 하나하나 사이트에서 검색하고 스크래핑하기에는 한계가 있다. 이럴때 영화 API를 쓰면 편하다.

이 웹사이트를 이용하여 진행! 
이런식으로 타이틀을 입력하면 우리가 지금 원하는 imdb 평점을 들고 올 수 있다! - 위의 사진에 보면 'Request'에 어떻게 요청을하면 'Response'를 얻을 수 있는지 나와 있다. 즉 저렇게 url에 접근만 하면 원하는 정보를 들고 올 수 있다!
import requests import urllib def get_omdb_info(title): base_url = "http://www.omdbapi.com/?" parameters = {"apikey":"your key", "t":title} #타이틀, 년도 등 파라미터들은 홈페이지에서 확인 가능 params_encoded = urllib.parse.urlencode(parameters) full_url = base_url + params_encoded # print(full_url) return requests.get(full_url).json() get_omdb_info("into the woods")- base_url + parameters 를 통해 full_url 주소를 만들기 위한 세팅을 한다
- 함수를 통해 넘어오는 매개변수('title')를 인코딩하여 붙여야 오류가 없기때문에 'urlencode'로 파싱을 해야한다

- 그 이 후 full_url을 세팅을 한다
- return 으로 requests를 이용하여 링크를 JSON 형태로 열 수 있게 한다

굿! ▶ 강의에서 얻고자하는 스코어는 사진에서 볼 수 있듯이 'Rotten Tomatoes' 의 스코어 이다. 이를 얻기 위한 작업이 필요 하다.
import requests
import urllib

def get_omdb_info(title):
    base_url = "http://www.omdbapi.com/?"
    parameters = {"apikey":"", "t":title}
    params_encoded = urllib.parse.urlencode(parameters)
    print(params_encoded)
    full_url = base_url + params_encoded
#     print(full_url)
    return requests.get(full_url).json()

def get_rotten_tomato_score(omdb_info):
    ratings = omdb_info.get('Ratings', [])
    for rating in ratings:
        print(rating)

info = get_omdb_info("into the woods")
get_rotten_tomato_score(info)
이렇게 들고와 진다! ▶ 완성 코드
더보기import requests
import urllib
def get_omdb_info(title):
base_url = "http://www.omdbapi.com/?"
parameters = {"apikey":"", "t":title}
params_encoded = urllib.parse.urlencode(parameters)
print(params_encoded)
full_url = base_url + params_encoded
# print(full_url)
return requests.get(full_url).json()
def get_rotten_tomato_score(omdb_info):
ratings = omdb_info.get('Ratings', [])
for rating in ratings:
# print(rating) #테스트 용!
if rating['Source'] == 'Rotten Tomatoes':
return rating['Value']
return None
info = get_omdb_info("into the woods")
get_rotten_tomato_score(info)▶ 이제 이 데이터를 합치면 된다.
for movie in movie_info_list:
    title = movie['title']
    omdb_info = get_omdb_info(title)
    #여기서 부터는 새로운 내용을 추가!
    movie['imdb'] = omdb_info.get('imdbRating', 'N/A')
    movie['metascore'] = omdb_info.get('Metascore', 'N/A')
    movie['rotten_tomatoes'] = get_rotten_tomato_score(omdb_info)
movie_info_list[-40]
굿! - 마지막으로 다시 데이터를 저장 해 주자!
save_data_pickle('disney_movie_data_final.pickle',movie_info_list)6. JSON 파일 및 CSV로 저장
- 저장 전 날짜 변경

이렇게 생긴 날짜를 일반적으로 바꿔 주자 - 먼저 원본 파일을 쉽게 JSON/CSV로 바꾸기위해서 카피
movie_info_copy = [movie.copy() for movie in movie_info_list]- 카비본으로 날짜 수정
for movie in movie_info_copy:
    current_date = movie['Release date (datetime)']
    if current_date:
        movie['Release date (datetime)'] = current_date.strftime("%B %d, %Y")
    else:
        movie['Release date (datetime)'] = None
- 최종 변경본 JSON 으로 재 저장
save_data("disney_data_final.json", movie_info_copy)
- CSV로 변경
import pandas as pd

df = pd.DataFrame(movie_info_list)

df.to_csv("disney_movie_data_final.csv")

굿! - 이렇게 데이터가 완성되면 여러가지를 해 볼 수 있다!
running_times = df.sort_values(['Running time (int)'], ascending=True)
running_times.head()
'빅데이터 > BeautifulSoup' 카테고리의 다른 글
BeautifulSoup 04 - Basics of data science tasks (3) - 데이터 정제 2 (0) 2022.01.05 BueatifulSoup 기초 및 활용 하기 05 - 네이버 블로그 스크래핑 (0) 2021.12.29 BueatifulSoup 기초 및 활용 하기 04 - 네이버 뉴스 스크래핑 (0) 2021.12.22 BueatifulSoup 기초 및 활용 하기 03 - 네이버 영화 스크래핑 (0) 2021.12.15 BueatifulSoup 기초 및 활용 하기 02 - 뮤직 순위 스크래링 (0) 2021.12.14