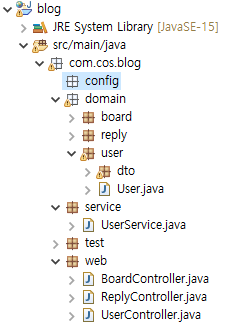
#1 JSP Project 03(Blog) - 프로젝트 전체 구조
210624~26 유투버 '데어프로그래밍'님 강의 참조
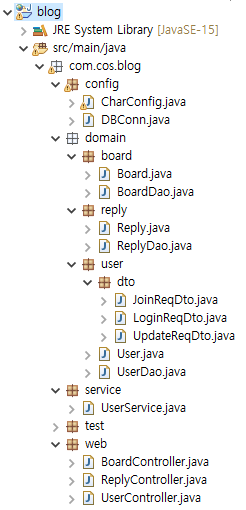
전체구조
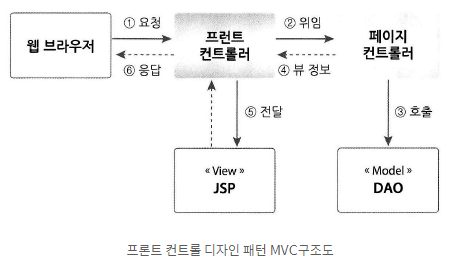
- 프론트 컨트롤러는 총 3개 (생성한 테이블 개수와 맞추는게 좋다. 하나로 모든 도메인을 처리하는것은 좋지않다)
- 프론트 컨트롤러란?
MVC디자인 패턴에서 사용하는 컨트롤러로써 각각의 뷰와 컨트롤러가 연결되어 독립적으로 처리하기보다는 대표 프론트 컨트롤러를 만들어서 뷰에서 들어오는 모든 요청을 담당하여 웹 어플리케이션에 짜져있는 구조를 실행한다.
//http://localhost8080/blog/user 요청시 이 컨트롤러 작동
@WebServlet("/user")
public class UserController extends HttpServlet {
	private static final long serialVersionUID = 1L;

	//http://localhost8080/blog/user?cmd=...
	protected void doProcess(HttpServletRequest request, HttpServletResponse response) throws ServletException, IOException {
		doProcess(request, response);
		String cmd = request.getParameter("cmd");
	}
}
*중요포인트
프론트 컨트롤러에서의 핵심은 'request.getParameter'를 통해 모든요청을 'http://localhost8080/blog/user?cmd=...' url로 처리하게 만든다는 것.
- request.getParameter란?
간단히 말해 클라이언트의 요청을 'String'형태로 받아서 해석을하여 자바가 거기에 맞도록 움직일수있는 역할(e.g. 클라이언트의 모든요청을 "cmd"로 해석해서 처리)
-기본 프로젝트 구조
1. UserController

@WebServlet("/user")
public class UserController extends HttpServlet {
*doGet
*doPost
	//http://localhost8080/blog/user?cmd=...
	protected void doProcess(HttpServletRequest request, HttpServletResponse response) throws ServletException, IOException {
		doProcess(request, response);
		String cmd = request.getParameter("cmd");

		//http://localhost8080/blog/user?cmd=loginForm
		if(cmd.equals("loginForm")) {
			//서비스 호출
          //http://localhost8080/blog/user?cmd=login
		} else if (cmd.equals("login")) {
	}
}
코드에 나와있듯이 컨트롤러는 요청만 받으면 그 요청을 해석해서 서비스만 호출하는 역할.
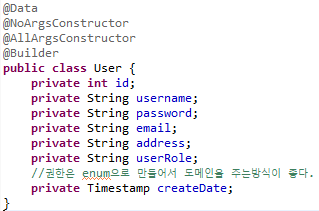
2. 서비스의 데이터 및 로직이 되는 Model
- Model의 역할은 DB에 만든 테이블과 똑같이 세팅을 한 후 DB로부터 데이터를 받기 위한 Object가 되는 것.


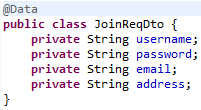
2-1. 서비스의 또 다른 데이터 및 로직이 되는 DTO
- DTO의 역할은 DB에 만든 테이블과 똑같이 세팅을 한 후 클라이언트로부터 데이터를 요청 받아 DB에 꺼내올 때 것.
- 요청/응답 DTO를 잘구분해야한다. (e.g. 회원가입/로그인 등은 request, 게시판리스트 response)
- DTO가 필요한 이유 3가지 1)Validation 체크 2)리플렉션 3)DB조인용


3. 컨트롤러의 호출 핵심, Service
- Service의 핵심은 '한 웹에 어떤 기능이 필요한가'로 부터 시작이 된다. 즉 기능을 세팅하는 것.
- User/Board/Reply는 각각 가지고 있는 기능이 다르다.
- 서비스는 모델로부터 데이터를 주고받고 한다!
//사용자에 대한 서비스 기능 - 회원가입/회원수정/로그인/로그아웃/아이디증복체크
public class UserService {

	//회원가입시에 정해진 데이터가 필요하기때문에 DTO와 똑같이 받아야함
	//insert --> 정해진 데이터 삽입
	public int 회원가입(JoinReqDto dto) {
		return -1;
	}
	//단순로그인이니 User model로 받으면 됨
	//select --> model과 맵핑 즉 User model
	public User 로그인(LoginReqDto dto) {
		return null;
	}

	public int 회원수정(UpdateReqDto dto) {
		return -1;
	}
//	로그아웃은 세션만 날리면 되기때문에 컨트롤러에서 처리
//	즉 response 관련은 컨트롤러에서 처리
//	public void 로그아웃() {}

	public int 아이디중복체크(String username) {
		return -1;
	}
}
4. 데이터베이스 연결 (DB연결부터 해도 상관없다)
- WEB-INF에 'web.xml' 생성 후 세팅
- META-INF에 'context.xml' 생성 후
- Connection pulling을 이용해서 연결 세팅
- contex.xml/web.xml = (https://tomcat.apache.org/tomcat-9.0-doc/jndi-datasource-examples-howto.html#MySQL_DBCP_2_Example) -> 'Resource name...>, <resource-ref...> 만 복사 수정
*context.xml
<?xml version="1.0" encoding="UTF-8"?>
<Context>
  <Resource name="jdbc/TestDB" auth="Container" type="javax.sql.DataSource"
               maxTotal="100" maxIdle="30" maxWaitMillis="10000"
               username="bloguser" password="bitc5600" driverClassName="com.mysql.cj.jdbc.Driver"
               url="jdbc:mysql://localhost:3306/blog?serverTimezone=Asia/Seoul"/>
</Context>

*web.xml
<?xml version="1.0" encoding="UTF-8"?>
<web-app version="4.0" xmlns="http://xmlns.jcp.org/xml/ns/javaee"
xmlns:xsi="http://www.w3.org/2001/XMLSchema-instance"
xsi:schemaLocation="http://xmlns.jcp.org/xml/ns/javaee; http://xmlns.jcp.org/xml/ns/javaee/web-app_4_0.xsd">
  <resource-ref>
      <description>DB Connection</description>
      <res-ref-name>jdbc/TestDB</res-ref-name>
      <res-type>javax.sql.DataSource</res-type>
      <res-auth>Container</res-auth>
  </resource-ref>
</web-app>
- config 패키지에 연결용 파일 세팅 및 코딩
- Connection pulling을 이용해서 연결 세팅
- (https://tomcat.apache.org/tomcat-9.0-doc/jndi-datasource-examples-howto.html#MySQL_DBCP_2_Example) -> code example 로직 그대로 사용
- 테스트해서 연결 확인까지 해야한다(dbtest.jsp)
public class DBConn {
	public static Connection getConnection() {
		try {
			Context initContext = new InitialContext();
			Context envContext = (Context) initContext.lookup("java:/comp/env");
			DataSource ds = (DataSource) envContext.lookup("jdbc/TestDB"); // contex.xml의 name 과 동일하게
			Connection conn = ds.getConnection();
			return conn;
		} catch (Exception e) {
			System.out.println("DB connection fail" + e.getMessage());
		}
		return null;
	}
}

4-1 web.xml에 필터 추가 + 필터를 작동시킬 CharConfig.java 추가
- 필터가 필요한 이유는 이름에서 알 수 있듯이 무언가를 걸러내는 역할을 하는데 JSP에서는 클라이언트와 서버간에 요청과 응답시에 서로에게 필요한것만 남기도록 필터링을 해준다고 보면된다
- 예로 인코딩정보/로그인정보 등 반복사용하는 자원을 이용할때 JSP파일 혹은 JAVA파일에 이에대한 코드를 전부다 넣어 처리해야하지만 이런일을 필터를 만들어놓으면 필터가 알아서 처리한다.
	<filter>
		<filter-name>charConfig</filter-name>
		<filter-class>com.cos.blog.config.CharConfig</filter-class>
	</filter>
	<filter-mapping>
		<filter-name>charConfig</filter-name>
		<url-pattern>/*</url-pattern>
	</filter-mapping>

    *url패턴이 /* 이므로 모든 페이지에 적용이 된다
public class CharConfig implements Filter {
	@Override
	public void doFilter(ServletRequest req, ServletResponse resp, FilterChain chain)
			throws IOException, ServletException {
		HttpServletRequest request = (HttpServletRequest) req;
		HttpServletResponse response = (HttpServletResponse) resp;
		request.setCharacterEncoding("utf-8");
		response.setContentType("text/html; charset=utf-8");
//		String username = request.getParameter("username");
//		System.out.println("username: " + username);
//		PrintWriter out = response.getWriter();
//		out.println("안녕");
//		out.flush();
		chain.doFilter(request, response);
	}
}

5 다시 controller로 돌아가서 로직을 되새겨보자
- 컨트롤러는 서비스로 보내기만 하기때문에 항상 service를 탄다고 생각해야한다.
- 컨트롤러에서 호출시에 페이지가 어떻게 생겼는지 생각을 잘해야한다. 예로 loginForm vs login은 어떻게 다른가?
- form이 붙으면 그냥 그 페이지를 달라는 것이고 form이 없는것은 그 기능을 수행하는 페이지이다.
- '...form'이 붙으면 단순 response(응답).sendRedirect(...)로 응답을 주면 된다
- '...form'이 붙지않으면 서비스에서 필요한 기능을 불러온다.
- 서비스가 필요한 데이터가공은 서비스에서 하는게아닌 컨트롤러에서 미리하고 서비스로 가공된걸 같이 던져준다. 즉 서비스를 설계했던 데이터 타입을 불러와서 가공처리 후 다시 서비스로 보낸다. (리플렉션을 쓰면 더 간단해진다)
@WebServlet("/user") public class UserController extends HttpServlet { *doGet *doPost protected void doProcess(HttpServletRequest request, HttpServletResponse response) throws ServletException, IOException { String cmd = request.getParameter("cmd"); UserService userSerivce = new UserService(); //http://localhost8080/blog/user?cmd=loginForm //서비스 호출 if(cmd.equals("loginForm")) { response.sendRedirect("user/loginForm.jsp"); } else if (cmd.equals("login")) { String username = request.getParameter("username"); String password = request.getParameter("password"); LoginReqDto dto = new LoginReqDto(); dto.setUsername(username); dto.setPassword(password); userSerivce.로그인(dto); } else if (cmd.equals("joinForm")) { response.sendRedirect("user/joinForm.jsp"); } else if (cmd.equals("join")) { String username = request.getParameter("username"); String password = request.getParameter("password"); String email = request.getParameter("email"); String address = request.getParameter("address"); JoinReqDto dto = new JoinReqDto(); dto.setUsername(username); dto.setPassword(password); dto.setEmail(email); dto.setAddress(address); userSerivce.회원가입(dto); } } }
6 Model에서 데이터를 받기위한 object를 만들었다면 실제로 DB와 데이터를 주고받는 DAO 생성
- DAO를 보면 DB와 무엇을 할 지 잘 보여준다
- 회원가입이면 insert, 수정이면 update 등 말 그대로 DB와 연동하여 데이터를 주고 받고 하는 식.
public class UserDao {

	public void save() { //회원가입
	}
	public void update() { //수정
	}
	public void usernameCheck() { //아이디 중복 체크
	}
	public void findById() { //회원정보보기
	}
}
전체 구조 짜기가 끝이 났다. 요약해 보자면...

1) 필수 파일 및 세팅들을 끝난 후
2) DB연결 확인을 하고
3) 컨트롤러/서비스/모델 (그외 DTO/DAO 등) 등 필요 기능 추가