스프링
반드시 알아야 할 기본 기능들 02
H-V
2021. 10. 18. 11:35
01 검색창
- 검색창은 페이징이 같이 되야하기때문에 Pageable이 같이 들어가야 오류없이 작동이 된다.
- 일단 JSP를 둘러볼 필요가 있다
검색창을 만드는 기본 디자인이 들어가고 거기에 검색구분을 나누는 부분과 검색 버튼에 각각 아이디를 준다<div style="margin: 1rem" class="float-right"> <form class="form-inline" action="" id="saerchForm"> <span class="m-3"><a href="/blog/blogForm" class="btn btn-success">블로그 쓰기</a></span> <br> <div class="form-group"> <label for="sel1"></label> <select class="form-control" id="sel1"> <option>검색</option> <option>작성일</option> <option>아이디</option> <option>제목+내용</option> </select> </div> <input class="form-control mr-sm-2" type="text" placeholder="Search" id="search" name=""> <button class="btn btn-success" type="submit" onclick="onSearch(event)">Search</button> </form> </div> - AJAX
검색구분자 선택 + 단어 입력 없이는 검색이 안되도록 1차로 막고 'window.location' 부분에서 gubun(검색구분자선택용) + text(입력된검색단어)를 받아서 주소가 만들어지도록 한다 (gubun+text는 dto에서 받는다)<script> function onSearch(event) { event.preventDefault() let gubun = $("#sel1 option:selected").val() //sel 값을 받아옴 console.log(gubun) if (gubun == "검색") { alert("검색 구분자를 선택하세요!") return false; } let text = $("#search").val() if (text == "") { alert("검색어를 입력 하세요"); $("#search").focus(); return false; } window.location = "/blog/findbytext" + "?page=0&gubun=" + gubun + "&text=" + text } </script> - DTO를 만들어서 검색 구분자 + 입력된 검색어를 위한 변수 설정
@Data public class SearchDto { private String gubun; private String text; } - 컨트롤러
검색기능을 담당하는 컨트롤러를 따로 만들자@GetMapping("/admin/findbytext") public String findByText(Model model, @ModelAttribute SearchDto dto, @PageableDefault(size = 3, sort = "id", direction = Sort.Direction.DESC) Pageable pageable) { Page<User> lists = userService.searchByText(dto, pageable); model.addAttribute("lists", lists); return "admin/userlist"; } - 서비스
dto에서 넘어온 값을가지고 구분자 선택이름에 맞게 switch문을 걸고 레파지토리 호출// 검색 - 모두 @Transactional(readOnly = true) public Page<Board> searchByText(SearchDto dto, Pageable pageable) { Page<Board> boardlist = null; System.out.println("pageable.getOffset()=" + pageable.getOffset()); System.out.println("pageable.getPageSize()=" + pageable.getPageSize()); System.out.println("pageable.getPageNumber()=" + pageable.getPageNumber()); switch (dto.getGubun()) { /* * case "전체": System.out.println("======================="); userlist = * boardRepository.findByText(dto.getText(), pageable); break; */ case "작성일": System.out.println("1111==========호출============"); boardlist = boardRepository.searchByDate(dto.getText(), pageable); break; case "제목 내용": System.out.println("2222==========호출============"); boardlist = boardRepository.findByText(dto.getText(), pageable); break; } return boardlist; } - 레파지토리
날짜 혹은 레파지토리에서 기본적으로 지원하는 검색전용 네이명을 제외하고는 직접 만들어야하고 쿼리도 짜야한다 (예는 아래와 같다)public interface BoardRepository extends JpaRepository<Board, Integer> { public void deleteById(int id); //날짜 검색 @Query(value = "SELECT * from Board WHERE date_format(board.createDate, '%Y-%m-%d') LIKE %?1%", countQuery = "SELECT count(*) FROM Board WHERE date_format(board.createDate, '%Y-%m-%d') LIKE %?1%", nativeQuery = true) Page<Board> searchByDate(String date, Pageable pageable); //제목+타이틀 @Query(value = "SELECT * FROM Board WHERE " + "title LIKE %?1% or " + "content LIKE %?1% ", countQuery = "SELECT count(*) FROM Board WHERE title LIKE %?1% or content LIKE %?1%", nativeQuery = true) Page<Board> findByText(String searchText, Pageable pageable); }
더보기
*부트+JPA에서 지원하는 기능들은 네이밍을 반드시 맞춰줘야한다 (쿼리는 안짜도 됨!)
Page<User> findByUsernameContaining(String username, Pageable pageable);
Page<User> findByEmailContaining(String email, Pageable pageable);

02 썸머노트 이미지 불러오기
- 게시판 글쓰기를 할때 하이라이트,정렬,이미지삽입등을 구현하려면 맨땅에서부터 모든 코드를 구현해야한다. 이를 쉽게 해주는게 섬머노트. 하지만 섬머노트를 이용해서 이미지 삽입을 하면 아래와 같이 저장 된다.

- 이 이미지 태그를 꺼내오는작업이 쉽지 않다.
- JSP에 이 이미지를 뿌릴 곳을 정한다.
<c:forEach var="item" items="${lists.content }"> <div class="card m-2" style="text-align: center;" display="inline-block; "> <div class="card-body" > <span>${item.id}</span> / <javatime:format value="${item.createDate}" pattern="yyyy.MM.dd" /> / <span style="font-size: 20px;">${item.user.username}</span> / <span>⬆조회수(${item.count })</span> / <span>⬆댓글수(${item.replyCount })</span> / <span>좋아요(${item.likeCount})</span> <hr> <h4 class="card-title" id="h1" style="color: #1E90FF;">${item.title}</h4> <hr> <p class="card-text" name="myname" id="c1"></p> <---- 이부분에 이미지를 뿌릴 예정 <hr> <a href="/blog/blogDetail/${item.id}" class="btn btn-primary float-right">상세 보기</a> </div> </div> </c:forEach> - JS를 이용해서 <img> 태그 부분을 추출 한다
게시판 특성상 <forEach>문으로 뿌리고 그 안에 콘텐트 영역이 있기때문에 그걸 그대로 들고와서 extract를 해준다. JS의 큰장점으로는 자바코드를 그대로 가져와서 사용가능하다는 것!<script> function imageExtract(text) { let myArray = myRe.exec(text); //console.log(myArray.length); if (myArray != null && myArray.length > 0) { //console.log(myArray[0]); let mytext = myArray[0]; let myRe2 = /width: \d+(px|%)/; let abc = mytext.replace(myRe2, 'width: 200px; height: 150px') //console.log(abc) return abc; } else { return ""; } } /* imageExtract(); */ $(document).ready(function() { let array = new Array(); //var temp = ""; <c:forEach var="item" items="${lists.content }"> //temp = '${item.content}'; //temp = imageExtract(temp) //console.log(temp) array.push(imageExtract('${item.content}')) </c:forEach> //console.log(array) array.forEach(function(item, index, arr2) { //console.log(item) $("p[name='myname']:eq(" + index + ")").html(item); }) }); </script>
또한 '정규표현식'이라는것(.exec)을 써서 여러태그 + 여러문자종류들이 섞여있는부분을 나눠서 뽑아올수있다!
중간의 if부분은 이렇게 추출해서 뿌려보면 잘 나오지만 유저가 이미지를 안올리고 글을쓰게되면 이미지를 가지고있는 나머지 글도 안보이는 현상이 있다. 그것을 해결하는 코드. 직접 이미지 사이즈 조절이 가능하다.
03 좋아요
- 좋아요를 구현하려면 따로 모델링을 해줘야 한다! 그리고 나머지는 똑같은 개념으로 구성
- 모델
@Builder @AllArgsConstructor @NoArgsConstructor @Data @Entity @Table(uniqueConstraints = { @UniqueConstraint(name = "likes_uk", columnNames = { "blogId", "userId" }) }) public class Likes { @Id @GeneratedValue(strategy = GenerationType.IDENTITY) private int id; @JoinColumn(name = "blogId") @ManyToOne private Blog blog; // 1개의 블로그는는 여러번 좋아요를 받는다 @JoinColumn(name = "userId") @ManyToOne private User user; // 1명의 유저는 여러번 좋아요를 한다 private LocalDateTime createDate; @PrePersist public void createDate() { this.createDate = LocalDateTime.now(); } } - 여기서 중요한 개념은 이 좋아요를 쓰는 모델에 무한참조 + 캐스캐이드(글 삭제시 좋아요도 함께 삭제되는데 캐스캐이드 없으면 오류가 걸린다.)를 걸어줘야 오류가 잡힌다.
public class Blog { ... @JsonIgnoreProperties({ "blog" }) @OneToMany(mappedBy = "blog", cascade = CascadeType.REMOVE) private List<Likes> likes; ... } } - 좋아요 컨트롤러
좋아요 컨트롤러는 따로 없다. 좋아요는 게시판에 구현되기때문에 거기에 넣으면 된다. 좋아요/좋아요 취소는 쉬운 로직이다. 조회가 필요한 이유는 좋아요가 찍혀있는지 안찍혀있는지를 판단해서 no/yes로 받아서 AJAX를 돌리는 것.public class BlogApiController { ... // 좋아요 @PostMapping("/api/blog/{blogId}/likes") public ResponseEntity<?> likes(@PathVariable int blogId, @AuthenticationPrincipal PrincipalDetails principalDetails) { likesService.like(blogId, principalDetails.getUser().getId()); return new ResponseEntity<>(new CMRespDto<>(1, "success", null), HttpStatus.CREATED); } // 좋아요 취소 @DeleteMapping("/api/blog/{blogId}/likes") public ResponseEntity<?> unlikes(@PathVariable int blogId, @AuthenticationPrincipal PrincipalDetails principalDetails) { likesService.unlike(blogId, principalDetails.getUser().getId()); return new ResponseEntity<>(new CMRespDto<>(1, "success", null), HttpStatus.CREATED); } // 좋아요 조회 @GetMapping("/api/blog/{blogId}/likes") public ResponseEntity<?> checklikes(@PathVariable int blogId, @AuthenticationPrincipal PrincipalDetails principalDetails) { List<Likes> likesList = likesService.likescheck(blogId, principalDetails.getUser().getId()); if (likesList.size() == 0) { return new ResponseEntity<>(new CMRespDto<>(1, "no", null), HttpStatus.CREATED); } else { return new ResponseEntity<>(new CMRespDto<>(1, "yes", null), HttpStatus.CREATED); } } - 좋아요 서비스
증가와 삭제는 어려운 부분이 없다. 중요한 부분은 좋아요가 체크가 되는 부분을 따로 구현해야한다.@Service @RequiredArgsConstructor public class LikesService { private final LikesRepository likesRepository; private final BlogRepository blogRepository; //좋아요 @Transactional public void like(int blogId, int principalId) { Optional<Blog> blog = blogRepository.findById(blogId); if(blog.isPresent()) { System.out.println("좋아요 증가 로직탐?=================="); Blog blog1 = blog.get(); blog1.setLikeCount(blog1.getLikeCount()+1); blogRepository.save(blog1); } likesRepository.like(blogId, principalId); } //좋아요 취소 @Transactional public void unlike(int blogId, int principalId) { Optional<Blog> blog = blogRepository.findById(blogId); if(blog.isPresent()) { Blog blog1 = blog.get(); blog1.setLikeCount(blog1.getLikeCount()-1); blogRepository.save(blog1); } likesRepository.unlike(blogId, principalId); } //좋아요 서치 @Transactional public List<Likes> likescheck(int blogId, int principalId) { return likesRepository.checklikes(blogId, principalId); } } - 레파지토리
좋아요/좋아요 취소는 쿼리문을 직접 짜서 넣어주고, 좋아요가 되었는지 확인을 하기위해서 하나더 추가를 해준다public interface LikesRepository extends JpaRepository<Likes, Integer> { @Modifying @Query(value = "INSERT INTO likes(blogId, userId, createDate) VALUES (:blogId, :principalId, now())", nativeQuery = true) int like(int blogId, int principalId); @Modifying @Query(value = "Delete FROM likes WHERE blogId = :blogId AND userId = :principalId", nativeQuery = true) int unlike(int blogId, int principalId); @Modifying @Query(value = "SELECT * FROM likes WHERE blogId = :blogId AND userId = :principalId", nativeQuery = true) List<Likes> checklikes(int blogId, int principalId); } - JSP
-> 일반 게시판 <span>좋아요(${item.likeCount})</span> -> 상세보기 들어가서 좋아요 가능하도록 화면 구현 <span id="likebtn">🧡</span> - 여기에 ajax를 통해 화면이동없이 좋아요 기능을 추가
$(document).ready(function(){ checkheart(); }); function checkheart(){ $.ajax({ type :"get", url : "/api/blog/${blog.id}/likes", success:function(resp){ console.log(resp); if(resp.message=="no"){ //alert("좋아요를 할 수 있어요!"); $("#likebtn").html("🤍") isliked = false; } else { $("#likebtn").html("🧡") isliked = true; } }, //success error:function(error){ console.log(error) alert("error") } })//ajax } function addlike(){ $.ajax({ type :"post", url : "/api/blog/${blog.id}/likes", success:function(resp){ console.log(resp); if(resp.message=="success"){ //alert("좋아요 성공"); checkheart(); } else { alert("좋아요 실패"); } }, //success error:function(error){ console.log(error) alert("error") } })//ajax } function deletelike(){ $.ajax({ type :"delete", url : "/api/blog/${blog.id}/likes", success:function(resp){ console.log(resp); if(resp.message=="success"){ //alert("좋아요 성공"); checkheart(); } else { alert("좋아요 실패"); } }, //success error:function(error){ console.log(error) alert("error") } })//ajax } </script>


04 댓글
- 댓글같은 경우에는 레파지토리를 제외하고 모두 쓰이는곳의 컨트롤러/서비스에서 구현 된다
- 모델
@Builder @AllArgsConstructor @NoArgsConstructor @Data @Entity public class Reply { @Id @GeneratedValue(strategy = GenerationType.IDENTITY) private int id; @Column(nullable = false, length = 200) private String content; @ManyToOne @JoinColumn(name="blogId") private Blog blog; @ManyToOne @JoinColumn(name="userId") private User user; private LocalDateTime createDate; @PrePersist public void createDate() { this.createDate = LocalDateTime.now(); } /* * public void update(User user, Blog blog, String content) { setUser(user); * setBlog(blog); setContent(content); } */ } - 컨트롤러
public class BlogApiController { ... // 댓글 쓰기 @PostMapping("api/blogDetail/{blogId}/reply") public ResponseEntity<?> replySave(@RequestBody ReplyDto replyDto) { blogService.replyInsert(replyDto); return new ResponseEntity<>(new CMRespDto<>(1, "Success", null), HttpStatus.OK); } // 댓글 삭제 @DeleteMapping("/api/blogDetail/{blogId}/reply/{replyId}") public ResponseEntity<?> replyDelete(@RequestBody ReplyDto replyDto) { System.out.println(replyDto.toString()+"=============================="); blogService.deleteReply(replyDto); return new ResponseEntity<>(new CMRespDto<>(1, "Success", null), HttpStatus.OK); } - 서비스
public class BlogService { .. // 댓글 쓰기 @Transactional public void replyInsert(ReplyDto replyDto/* , Reply reply */) { /* * 영속화 첫번째 개념 User user = * userRepository.findById(replyDto.getUserId()).orElseThrow(() -> { return new * IllegalArgumentException("댓글 실패 : 유저 아이디 못찾음"); }); // 영속화 * * Blog blog = blogRepository.findById(replyDto.getBlogId()).orElseThrow(() -> { * return new IllegalArgumentException("댓글 실패 : 블로그 아이디 못찾음"); }); * * * Reply reply = new Reply(); reply.update(user, blog, replyDto.getContent()); * * * Reply reply = * Reply.builder().user(user).blog(blog).content(replyDto.getContent()).build(); */ // Optional<Blog> b = blogRepository.findById(reply.getBlog().getId()); // b.get().setReplyCount(b.get().getReplyCount()+1); replyRepository.mSave(replyDto.getUserId(), replyDto.getBlogId(), replyDto.getContent()); int blogId = replyDto.getBlogId(); Optional<Blog> blog = blogRepository.findById(blogId); if (blog.isPresent()) { blog.get().setReplyCount(blog.get().getReplyCount() + 1); blogRepository.save(blog.get()); } - 레파지토리
public interface ReplyRepository extends JpaRepository<Reply, Integer>{ @Modifying @Query(value = "INSERT INTO reply (userId, blogId, content, createDate) VALUES(?1,?2,?3, now())", nativeQuery = true) int mSave(int userId, int blogId, String content); //modifying은 리턴값이 숫자형이기때문에 int로 받아야 함 } - JSP
<div class="card"> <form> <input type="hidden" id="userId" value="${principal.user.id}" /> <input type="hidden" id="blogId" value="${blog.id}" /> <div class="card-body"> <textarea id="reply-content" class="form-control" rows="1"></textarea> </div> <div class="card-footer"> <button type="button" id="btn-reply-save" class="btn btn-warning">댓글 쓰기</button> </div> </form> </div> <br> <div class="card"> <div class="card-header">댓글</div> <ul id="reply--box" class="list-group"> <c:forEach var="reply" items="${blog.replies}"> <li id="reply--${reply.id}" class="list-group-item d-flex justify-content-between"> <div> ${reply.content} <span class="text-primary">(<javatime:format value="${reply.createDate}" pattern="yyyy.MM.dd HH:mm" />) </span> </div> <div class="d-flex"> <div class="font-weight-bold">작성자: ${reply.user.username } </div> <c:if test="${reply.user.id == principal.user.id}"> <button onClick="index.replyDelete(${blog.id}, ${reply.id})" class="btn btn-danger btn-sm badge" style="font-size: 13px">삭제</button> </c:if> </div> </li> </c:forEach> </ul> </div> <script src="/js/blog.js"></script> - blog.js
let index = { init: function() { ... $("#btn-reply-save").on("click", () => { this.replySave(); }); }, ... replySave: function() { //this.save()의 save //alert("user.js의 save 함수 호출됨"); if ($("#reply-content").val() == "") { alert("댓글을 입력하세요."); $("title").focus(); return false; } let data = { userId: $("#userId").val(), blogId: $("#blogId").val(), content: $("#reply-content").val() }; console.log(data); $.ajax({ //ajax 기본 호출은 비동이 //오브젝트가 들어오는 곳 //통신 수행 type: "post", url: `/api/blogDetail/${data.blogId}/reply`, data: JSON.stringify(data),//HTTP BODY DATA contentType: "application/json; charset=utf-8", //body데이터의 타입 dataType: "json" //서버에서 받을 데이터 형식, 즉 json으로 던지고 서버를위해 자동 파싱 = JSON->JS }).done(function(resp) { //위의 데이터가 js로 바뀌고 파라미터로 사용 가능 //통신이 정상이면 done alert("댓글 쓰기 완료"); //alert(resp) console.log(resp); location.href = `/blog/blogDetail/${data.blogId}`; }).fail(function(error) { //통신이 비정상이면 fail alert(JSON.stringify(error)); }); }, replyDelete: function(blogId, replyId) { //this.save()의 save if (!confirm("정말 삭제할까요?")) return false; let data = { replyId: replyId, blogId: blogId }; console.log(data); $.ajax({ type: "DELETE", url: `/api/blogDetail/${blogId}/reply/${replyId}`, data: JSON.stringify(data), contentType: "application/json; charset=utf-8", dataType: "json" //서버에서 받을 데이터 형식, 즉 json으로 던지고 서버를위해 자동 파싱 = JSON->JS }).done(function(resp) { //위의 데이터가 js로 바뀌고 파라미터로 사용 가능 //통신이 정상이면 done alert("댓글 삭제 완료"); //alert(resp) console.log(resp); location.href = `/blog/blogDetail/${blogId}`; }).fail(function(error) { //통신이 비정상이면 fail alert(JSON.stringify(error)); }); }, } index.init();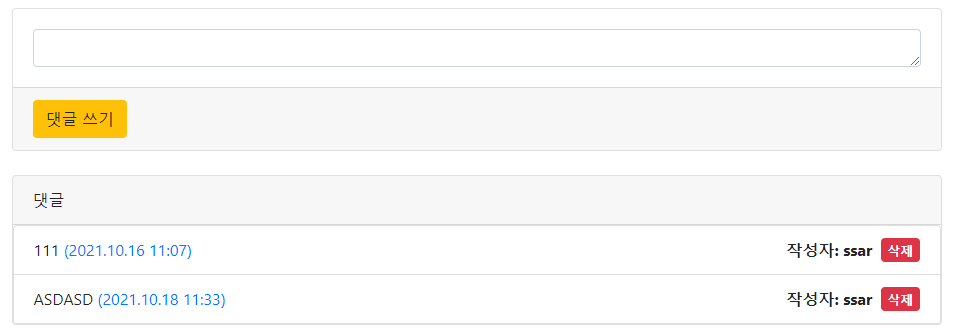
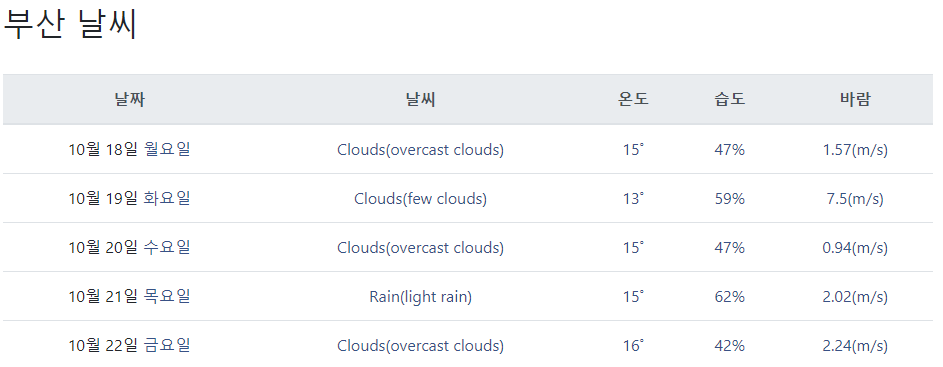
05 날씨 API
- 날씨 API는 자료가 별로 없다. 'openweathermap.org'에서 쓰는것이 가장 베스트인거 같다.
- 이 API는 따로 컨트롤러등을 만들필요없이 뿌리는 화면에서 AJAX로 처리해서 뿌리기만 하면 끝
- JSP
<h2>부산 날씨</h2> <br> <table class="table table-hover" style="text-align: center"> <thead class="thead-light " style="font-wiehgt: bold;"> <tr> <th>날짜</th> <th>날씨</th> <th>온도</th> <th>습도</th> <th>바람</th> <tr> </thead> <tbody> <tr> <td><%=month%>월 <%=day%>일 <span id="placeholder"></span></td> <td><span id="Weather3"></span></td> <td><span id="Tmp3"></span></td> <td><span id="Hmd3"></span></td> <td><span id="Wind3"></span></td> </tr> <tr> <td><%=month%>월 <%=day + 1%>일 <span id="placeholder2"></span></td> <td><span id="Weather11"></span></td> <td><span id="Tmp11"></span></td> <td><span id="Hmd11"></span></td> <td><span id="Wind11"></span></td> </tr> <tr> <td><%=month%>월 <%=day + 2%>일 <span id="placeholder3"></span></td> <td><span id="Weather19"></span></td> <td><span id="Tmp19"></span></td> <td><span id="Hmd19"></span></td> <td><span id="Wind19"></span></td> </tr> <tr> <td><%=month%>월 <%=day + 3%>일 <span id="placeholder4"></span></td> <td><span id="Weather27"></span></td> <td><span id="Tmp27"></span></td> <td><span id="Hmd27"></span></td> <td><span id="Wind27"></span></td> </tr> <tr> <td><%=month%>월 <%=day + 4%>일 <span id="placeholder5"></span></td> <td><span id="Weather35"></span></td> <td><span id="Tmp35"></span></td> <td><span id="Hmd35"></span></td> <td><span id="Wind35"></span></td> </tr> </tbody> </table> <br> </div> <br> - AJAX
AJAX를 제외하고 요일별로 뿌리기 위해서는 따로 함수 + 계산식이 필요하다!<script> var apiURI = "https://api.openweathermap.org/data/2.5/forecast?q=Busan&appid=51a9596817c1a197fb2e23f7a88ec9cd"; $(function() { $.ajax({ type : "GET", url : apiURI, success : function(resp) { let result = resp.list; let a = 1; for (i = 1; i < result.length; i++) { if (i % 8 == 3) { console.log(result[i]); $("#Weather" + a).html( result[i].weather[0].main + "(" + result[i].weather[0].description + ")") $("#Tmp" + a).html( Math.ceil(result[i].main.temp - 273.15) + "˚") $("#Hmd" + a).html(result[i].main.humidity + "%") $("#Wind" + a).html(result[i].wind.speed + "(m/s)") } a += 1; } } }) }) </script> <script> var now = new Date(); var week = new Array('일요일', '월요일', '화요일', '수요일', '목요일', '금요일', '토요일'); function oneDay() { var today = new Date(); var todayLabel = week[today.getDay()]; return todayLabel; } function twoDays() { var today = new Date(); var tomorrow1 = new Date(today.valueOf() + (24 * 60 * 60 * 1000)); var tomorrow1Label = week[tomorrow1.getDay()]; return tomorrow1Label; } function threeDays() { var today = new Date(); var tomorrow2 = new Date(today.valueOf() + (24 * 60 * 60 * 1000 * 2)); var tomorrow2Label = week[tomorrow2.getDay()]; return tomorrow2Label; } function fourDays() { var today = new Date(); var tomorrow3 = new Date(today.valueOf() + (24 * 60 * 60 * 1000 * 3)); var tomorrow3Label = week[tomorrow3.getDay()]; return tomorrow3Label; } function fiveDays() { var today = new Date(); var tomorrow4 = new Date(today.valueOf() + (24 * 60 * 60 * 1000 * 4)); var tomorrow4Label = week[tomorrow4.getDay()]; return tomorrow4Label; } document.getElementById('placeholder').innerText = oneDay(); document.getElementById('placeholder2').innerText = twoDays(); document.getElementById('placeholder3').innerText = threeDays(); document.getElementById('placeholder4').innerText = fourDays(); document.getElementById('placeholder5').innerText = fiveDays(); </script>